Just in case you find yourself here for the first time I thought I'd let you know how my blogs work. I have one for each project. Some are sold (!), some are finished and some are just ideas with maybe some bits of collecting being done for them; but there will always be one blog with a project in process.
I do one 'build' in the summer when I am in the UK and one in the winter in the USA.
At the time of writing my 2013 summer project was Chocolat. That project is finished and will appear in a series of articles in Dolls House & Miniature Scene magazine next year.
I am now in Naples in Florida for the winter and my current project is one of a set of three, quarter scale, houses. The blog for this is My Quarter Life. So, until I return to the UK in April and begin my 2014 Summer project the quarter scale blog will be the active one.
I do sometimes nip in and out of the others for some reason or another but, in the main the two active blogs will be the current project and the Dolls House Shows blog.
Thursday 26 December 2013
Tuesday 17 December 2013
It must be Christmas
Day four of our sojourn in Naples and my parcels are beginning to arrive. I have six orders 'out there' and this is one which was mailed to me last Friday and arrived today (Monday).
It is from the marvellous Suzanne and Andrews Miniatures. Go and have a look at their stuff if you are not familiar with them especially seek out Pickett Pond - a masterpiece, I kid you not.
Don't forget you can click on a photo to enlarge it.
Here we go:

The teaspoon is for anyone not familiar with quarter scale.
8 plates and a door mat

2 place settings
2 pairs of scissors
a comb
3 plates

I love this set and it will be in the master bedroom.
I hope to make my little people a glam bedroom and bathroom for their getaway home in the Cairngorms.

Stuart and Elizabeth are trying to collect a miscellany of arts and crafts style furnishings so I thought this would sit well with that.

This is a really nice collection of art work (and plates) and will probably be as much as I need for the gatehouse.
All I have to do is figure out how to frame the pictures. There is also a piece of mirror card in the pack which I know will be useful sometime.
I also bought some findings to make lights (ho ho ho!) and glue and Min-wax pens so I am probably ready to get stuck in...... maybe tomorrow?
Wednesday 11 December 2013
Meet the McKenzies
This hobby certainly converts you very quickly into 'nutcase'. This is the day before we fly, a couple of minutes before going out to do a load of chores and I decided - while my tea is cooling down a bit - I'd have time to photograph the inhabitants of the Gate House and share them with you.
Meet Andrew and Elizabeth McKenzie. Mid thirties, high flyers, living in Edinburgh and spending Christmas in their holiday home -The Gate House - in the Cairngorms.

At this scale you can't be too picky about your little people. Andrew looks like a mass murderer and Elizabeth should have had something done about that leg years ago. They might not be beautiful but they're mine and I love them.
They were both blonde but Andrew got a hair dye late last night - far too Jimmy Dean otherwise.
Meet Andrew and Elizabeth McKenzie. Mid thirties, high flyers, living in Edinburgh and spending Christmas in their holiday home -The Gate House - in the Cairngorms.

They were both blonde but Andrew got a hair dye late last night - far too Jimmy Dean otherwise.
Tuesday 10 December 2013
Stair set two
This is what you learn after doing one set of stairs:
 Only colour in the pieces; that way you can see the wood for the trees. Sloshing stain everywhere like I did last time meant I wasn't sure what was waste and what was kit. If you do a colouring-in exercise it is much clearer when you come to snip them out. Saves stain too. Also, please notice they have been buffed!
 I don't know if this is good thing to share, but this time I snipped the pieces out (carefully) with scissors. I find the wood hard to cut. I started with a new blade on this one but I still wasn't getting through the tabs, so I resorted to scissors. I thought it was much easier. The two bladed scissor action does want to twist the work slightly though, so be careful if you try this. Do the easy bits first and see if you think you are OK with it.
 I hope this shows you the edges which need finishing off with stain BEFORE assembly.
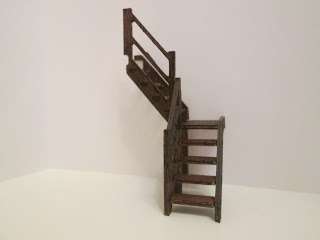
As always I forgot to show you the end result - the completed set of stairs. Hey ho: just refer back to the previous set of stairs and imagine a slightly better finish and done in half the time.
The big lesson learned doing the second set of anything is - the second is loads easier than the first!


As always I forgot to show you the end result - the completed set of stairs. Hey ho: just refer back to the previous set of stairs and imagine a slightly better finish and done in half the time.
The big lesson learned doing the second set of anything is - the second is loads easier than the first!
Three roofs
This is an unusual project in that it is really made up of two buildings - the gate and the cottage. This gives it four 'normal' roof sides plus the conical roof on the round tower.
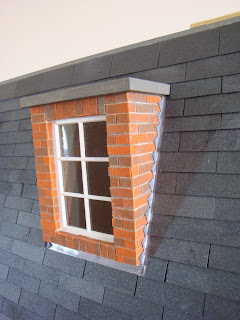
I love Richard Stacey versi-bricks and tiles for finishing buildings and I have used them on my 1/12ths. This photo is part of the roof on Bentleys. Even the wonderful RS doesn't make 1/48th slates; no-one is daft enough to want to stick those on a roof, one by one.
Then there's me. I just can't imagine finishing a roof any other way and liking it.

My first thought was, I just had to cut it into four. They were fine but looked a bit large? I realised 1/48th really meant dividing its length into four and its width into four. In other words I would be operating with a sixteenth of the usual area. The slate is something like 3/16ths by 3/8ths of an inch.
I am still up for it though. All it needs is a lot of patience.
The real challenge rests with the conical tower.
 I did some research into the real life slating of such a construction and even on that scale it is a very skilled job. Each row of tiles has to reduce in size and be shaped correctly to take in the reducing curved surface.
Some site gave me a mathematical formulae to calculate the sizes needed. I couldn't follow it in RL size and wasn't prepared to countenance it quarter scale. I am cracked but not that cracked.
So I have the original (lack of) size problem plus re-cutting to accommodate the cone plus a very shiny surface to glue to.
I could cover or paint it to look like a lead or copper roof instead but then it is asking for a better model builder than me to finish the metal so that it looks right. All that verdigris!
I could do a complete cop-out and settle for snow!
Monday 9 December 2013
One flight of madness
This is my first 1/48th moment and conclusions are drawn. You have to be very nimble-fingered, patient and willing to persevere. I am sure after doing this stuff for some time everything gets much easier, but for the first ever job in this scale these stairs tested my fingers, patience and perseverance to their limit.
 Step one was to stain the pieces on both sides. I have a great glue which will stick stained pieces and I can't imagine trying to stain the finished piece when it is as tricky a shape as this one.
Problem one was I found it quite hard to determine which were the bits I needed and what was scrap. I can only recommend you do as I did and refer endlessly to any diagram you have with the kit and carefully identify each shape, one at a time. Then, equally carefully, locate any tabs attaching the piece to the waste. Check, check and check before picking up the knife.
 I am happy to say I got it right and ended up with all the pieces and nothing broken.
The tabs you see on these components are the tabs needed for construction - these increased the identification doubts a little more.
Again, learn from me, the next thing you should do is go over all these pieces again with your stain pen and touch in all the pale edges which didn't received stain while they were still in the 'frame'. I didn't do this and spent ages fiddling around with the finished staircase, touching up bits and bobs here and there.
 I decided not to put glue on the joints before assembly because they took so much time to get right and I was nervy about the glue setting up on something that wasn't at quite the right angle.
I assembled the lower stairs and then pushed glue into the joins. It seems to have worked just fine.
 Here they are (before touch-up) next to my glasses to give you some idea of size. They measure about two and a half inches high.
The stairs below are the finished product after a bit of a tidy up.
Modern cameras are too 'powerful' for pictures of a lot of things I think. My point-and-shoot is 16 mega-pixels and I don't like the resulting photos half as much as the ones I used to take with its predecessor (8 mega-pixels?).
I think they are far too detailed and show every little scar and blemish, especially at this scale. They see more than the naked eye does and records it for posterity. All I can say is that in real life this looks just fine. Wish I'd buffed them though!
Come back tomorrow to have a look at my plans for the roof.

Problem one was I found it quite hard to determine which were the bits I needed and what was scrap. I can only recommend you do as I did and refer endlessly to any diagram you have with the kit and carefully identify each shape, one at a time. Then, equally carefully, locate any tabs attaching the piece to the waste. Check, check and check before picking up the knife.

The tabs you see on these components are the tabs needed for construction - these increased the identification doubts a little more.
Again, learn from me, the next thing you should do is go over all these pieces again with your stain pen and touch in all the pale edges which didn't received stain while they were still in the 'frame'. I didn't do this and spent ages fiddling around with the finished staircase, touching up bits and bobs here and there.

I assembled the lower stairs and then pushed glue into the joins. It seems to have worked just fine.

The stairs below are the finished product after a bit of a tidy up.
Modern cameras are too 'powerful' for pictures of a lot of things I think. My point-and-shoot is 16 mega-pixels and I don't like the resulting photos half as much as the ones I used to take with its predecessor (8 mega-pixels?).

I think they are far too detailed and show every little scar and blemish, especially at this scale. They see more than the naked eye does and records it for posterity. All I can say is that in real life this looks just fine. Wish I'd buffed them though!
Come back tomorrow to have a look at my plans for the roof.
Sunday 8 December 2013
Testing stain pens
Those of you involved in this game know what it is like to have a half day on your hands and minis crying out to be made. So much for leaving well alone until I get back next March.
I decided I might as well have a go at building the stairs. Absolutely every one of these processes are new to me. I have never used stain pens, never nipped laser cut stuff from a sheet of wood or built a 1/48th anything. Here we go....
 First I tested the pens. These are made by TJM Limited otherwise known as Home Bargains. I have no idea of their price but I doubt more than two or three pounds if that.
There are six colours each in stain pens and touch up filler sticks. I have no idea what you can do with the latter - they aren't made for staining wood for sure.
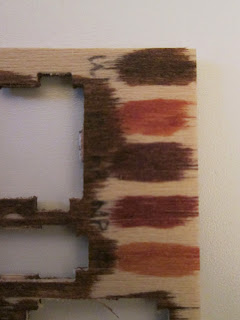
I tried the five wood colours - the sixth is black.
From the top:
Walnut
Cherry
Mahogany
Maple
Oak
If you do this remember to blank off the ones either side when you are judging a colour. Seeing colours on either side of the colour you are focussing on will affect the result. Choosing is never easy but I am not keen on the 'redness' of the middle three and the oak is just too light for anything that's been around for a couple of hundred years - so Walnut it is.
I gravitate to walnut every time it seems.
 I then tested my usual walnut stain - Colron Wood Dye - American Walnut against the pen - this is a single coat of each.
I would probably prefer the effect of the usual stain (with a second coat) but, always being one for the short-cut, getting it done in one go with the pen seemed a good option. After all, this isn't fine furniture, its just a couple of flights of cottage stairs.
The only other thing to remember (and I didn't!) is to stain then let it dry for as long as possible and then rub it down - kitchen roll is good for this. This buffing will remove excess stain, de-nib the wood and add a slight sheen. If you look again at the five colour test (top right) with no buffing and the two product test (bottom left) with buffing, you can probably see the difference.
As I said my 'method' was to stain the wood, not let it dry thoroughly and forgot to buff it! 'Do as I say, not as a I do' might be worth remembering when reading my stuff.
Check in tomorrow if you want to see the stairs. They are done but I don't want to 'overload' you.
I decided I might as well have a go at building the stairs. Absolutely every one of these processes are new to me. I have never used stain pens, never nipped laser cut stuff from a sheet of wood or built a 1/48th anything. Here we go....
 First I tested the pens. These are made by TJM Limited otherwise known as Home Bargains. I have no idea of their price but I doubt more than two or three pounds if that.
There are six colours each in stain pens and touch up filler sticks. I have no idea what you can do with the latter - they aren't made for staining wood for sure.

I tried the five wood colours - the sixth is black.
From the top:
Walnut
Cherry
Mahogany
Maple
Oak
If you do this remember to blank off the ones either side when you are judging a colour. Seeing colours on either side of the colour you are focussing on will affect the result. Choosing is never easy but I am not keen on the 'redness' of the middle three and the oak is just too light for anything that's been around for a couple of hundred years - so Walnut it is.
I gravitate to walnut every time it seems.

I would probably prefer the effect of the usual stain (with a second coat) but, always being one for the short-cut, getting it done in one go with the pen seemed a good option. After all, this isn't fine furniture, its just a couple of flights of cottage stairs.
The only other thing to remember (and I didn't!) is to stain then let it dry for as long as possible and then rub it down - kitchen roll is good for this. This buffing will remove excess stain, de-nib the wood and add a slight sheen. If you look again at the five colour test (top right) with no buffing and the two product test (bottom left) with buffing, you can probably see the difference.
As I said my 'method' was to stain the wood, not let it dry thoroughly and forgot to buff it! 'Do as I say, not as a I do' might be worth remembering when reading my stuff.
Check in tomorrow if you want to see the stairs. They are done but I don't want to 'overload' you.
Monday 2 December 2013
Pause the build
We are about to make our third attempt at leaving the UK for our winter in Florida. It has now become half a winter in Florida but, with luck, we will be departing shortly. I, therefore, have to abandon the build. I won't be giving up on the project though as I have six orders for things for The Gatehouse on their way to me in the States. I will have lots of things to make to go in The Gatehouse next summer.
This is a second dry build, done today, waiting to remind me in 3D what I am aiming for. I feel a lot more confident about the actual build now as I know where everything goes and how.
It would be daft rush it and try to get some done in the next few days before I go. As I said I have stuff on order and it includes wallpaper and floor paper. I need to decide what to use where and this will have a knock-on effect as to what paint colours I want to use, so I can't really start on the interior finishes over here. I think the outside surfaces might be better done after the build (????) The down-side to that is that setting in the windows and doors might be a bit fiddly working with a building rather than a wall. I think it will be doable though. About the only components I could work on are the windows, doors and stairs..... I am tempted.
I have lights and fires to install throughout and need to really figure out how best to do that. I will need to drill exit holes for the wires even if I don't need to cut grooves for the wiring. I can't do any of this until I have actually had a go at making lights and fires. If they turn out to be rubbish then I won't be lighting this kit!! Again quite a bit of those things are in Naples already.
 So all I can do is get super-organised (I hope). I have measured everything to within an inch of its life and annotated the component sheets to take with me ready for any shopping I do for it; plus the paint chart for the three colours I already have and so I can consider others.
I have taken photos of all four side of each halves of the building so I know where windows and doors are for when I have a brainwave like the one I had to reject today when I saw the build again. I started to order some lovely step cupboards - those cupboards that fit beautifully under stairs. Not in this house they won't. There is a spiral staircase and two sets of stairs but even they turn about on themselves.
I might take 'Elizabeth' and 'Stuart' with me to remind me who is living there and to give me a sense of scale. I manage that best against a human form. Measuring a teacup or a slice of cake is one thing, putting it in a figure's hands is another.
So, for the next three months you will just be following furniture kits, lights, fires etc. being put together and, hopefully, seeing lots of shopping and a couple of shows.
Au revoir for now.
 |
| ready and waiting |
It would be daft rush it and try to get some done in the next few days before I go. As I said I have stuff on order and it includes wallpaper and floor paper. I need to decide what to use where and this will have a knock-on effect as to what paint colours I want to use, so I can't really start on the interior finishes over here. I think the outside surfaces might be better done after the build (????) The down-side to that is that setting in the windows and doors might be a bit fiddly working with a building rather than a wall. I think it will be doable though. About the only components I could work on are the windows, doors and stairs..... I am tempted.
I have lights and fires to install throughout and need to really figure out how best to do that. I will need to drill exit holes for the wires even if I don't need to cut grooves for the wiring. I can't do any of this until I have actually had a go at making lights and fires. If they turn out to be rubbish then I won't be lighting this kit!! Again quite a bit of those things are in Naples already.

I have taken photos of all four side of each halves of the building so I know where windows and doors are for when I have a brainwave like the one I had to reject today when I saw the build again. I started to order some lovely step cupboards - those cupboards that fit beautifully under stairs. Not in this house they won't. There is a spiral staircase and two sets of stairs but even they turn about on themselves.
I might take 'Elizabeth' and 'Stuart' with me to remind me who is living there and to give me a sense of scale. I manage that best against a human form. Measuring a teacup or a slice of cake is one thing, putting it in a figure's hands is another.
So, for the next three months you will just be following furniture kits, lights, fires etc. being put together and, hopefully, seeing lots of shopping and a couple of shows.
Au revoir for now.
Subscribe to:
Posts (Atom)