Friday, 29 November 2013

Totally floored by this...

click on the photo to enlarge
This must be the best real wood flooring for quarter scale ever.  It comes in this lovely (American) walnut.  I know it finishes beautifully because I have used its big 1/12th sister in all my 1/12th projects and I just love the end result.  I usually finish it with a water-based B & Q silk varnish - two coats if I want a more polished look.  I am sure it would finish with any method you choose.

There is also a light version which you could (wood) stain any colour you liked.  I have used that too for painted wooden floors and it is equally brilliant.

It couldn't be any easier to lay: I use double sided sticky tape, needs to be the thin stuff like Sellotape,   This means if there is ever any problem with the lights or you want a change, it can be removed easily.


click on the photo to enlarge
This is waaaay over-magnified to show you a single width floorboard.  They actually measure one eighth of an inch giving a scaled up floorboard width of six inches which is historically perfect for the Gatehouse.

I just love it and can't wait to use it and show it you in situ, BUT, I have to figure out lights and wiring grooves first.  Not an easy task with 1/48ths because you can't just buy lights like you can with 1/12ths.

PS to the paint

I know I am going on about this paint company but for us 'little people' it is a good find.  This arrived this morning - a lovely colour chart (plus a smaller one).  


The 'clever' angle is they have colour chips that are only fastened down half way so you can slip stuff under each one when you are colour matching/blending/contrasting with other stuff.

I don't have shares in the company, honestly!

Little Greene Paint and Paper 1773

Wednesday, 27 November 2013

The stuff that excites some people!


Click on the photo for a better look.

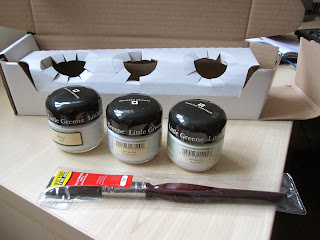
Only another mini person will understand why this is exciting.  My three paint colours arrived this morning!  Yeahhhhh!

I think the best way to approach this quarter scale malarkey is to 'finish' as much as possible BEFORE building the structure.  I just can't imagine fiddling about inside those small rooms.  So, right now, I am planning on doing all the painting and decorating and wiring and floor-laying and sticking in of doors and windows before I actually assemble the building.  I know this means being careful about not going over any edges that need to slide or be stuck.  I will just have to try and work that out as I go along.  If it gets tough I will  renege and bash on with the build and see where I go from there.

Right now, I am waiting for paint, wallpaper and flooring to even begin.  

Episode one - three paints arrive.

Aren't they just dinky.  Lovely, lovely paint company called Little Greene Paint and Paper.  In spite of their name, they are a 'life size' company, of course, but their sample pots are beautifully packaged in little glass jars - nice for keeping for touch ups and remixing.  Boxed beautifully, mailed quickly and a free 1/2" paint brush.  Best of all they have the very best range of colours I have seen bar none.  Their wallpaper is glorious - what I wouldn't I give to have it in 1/12th, 1/24th and 1/48th!  It will be going in my real home next year.

Today, when my chores budge over, I will be making a start.  Bit naughty really as The Gate House is now my (back-in-the-UK) summer project for 2014.  Those who follow my 'life' will know all our routines are topsy-turvy right now, so why not this as well.

Saturday, 23 November 2013

So it begins

Finally after ten days ownership I was able to get started on The Gatehouse.  Life just kept getting in the way.  As always I began with a dry build and a big think, here's the results.


First of all I masking-taped three images to the wall where I am working so I can constantly check which way is up.


Opened the box and took out the first package.  The kit is described as having two buildings - a cottage and a tower.  They are built separately and then joined together.  So, this package contained the pieces for the cottage plus two tower rings - I have no idea what those are or where they go as yet.  Hopefully that will become clear further down the line.


A bit of jiggling and some masking tape later and this is the bones of the cottage.  I am really pleased one side of the material is already white - that's the ceilings sorted and maybe even the walls.  It does have windows in the side wall either side of the chimney.  I was going to be ambitious and cut out the roof for roof lights - off that idea now.  Hurrah!


The tower side of the building all taped together.  The fit is beautiful on this kit, just as I imagined it would be.


These will be lovely beams in the roof of the top room in the tower side - making a lovely bedroom.  Imagine lying in bed looking up at those.


Here is the building with the two pieces put together and the chimneys sorted.  Geoff Lewis uses a clever arrangement of aligning stuff with cocktail sticks through purpose-made holes - brilliant stuff.


Windows, trims, main door.  I have read the instructions for assembling the main door but haven't a clue.  Again I am living in hopes it all becomes clear when I get there.  Eat the elephant one bite at a time.


This is real fear number one - the stairs.  There are two sets - this is one of them - just look at how many bits and they are teeny, tiny.  Bit of a challenge.  I can see they are tabbed so maybe no too bad?


Close behind comes panic two - the round tower.  There are three bags of stairs which makes the tower. There were also a couple of mystery pieces in the cottage pack.  I am in love with the dinky little turret roof.  Again, who knows, actually making this tower might prove to be a breeze.

Doing a dry build and having a good sort out helps calm the jitters and makes me stop and think carefully about the order of build.  In this particular case I am pretty sure I will be painting and staining (and maybe wall papering) every little bit before I glue anything together.  This size is way too small for someone like me to be fiddling about around windows and doors and inside pointy ceilings.  What finish for what surface needs to be settled before its meets its neighbour.  My brilly bob 'rocket' glue can handle paint and stain, so no worries there.

Off to do a dry build on the tower if that's possible.  Whilst typing that the other half of my brain said, just go and play and hunt round the web for window glass and wallpaper and paint colours and flooring and and and.....




Wednesday, 20 November 2013

Treasures galore

I have been having an after the show (Midlands show, Droitwich) photo album tidy up and realised I have an album of 48ths that I have been collecting for the projects in America.  Most, if not all of them, will now be used in The Gate House.  For the time being they are all being scooped up into that projects box and my on-line 'filing'.

The purchases album currently holds sixty-one items.  This would be a bit much for a single post!  There is a link on the left side of this blog if you want to take a look.

I might even have some more unphotographed items waiting in the States and in my suitcase destined for the States so I will have a grand sort out when I eventually get there. Meanwhile I thought you might like to sample the sweetness of these lovely little 48ths by looking at the ones I have bought since I knew about this project.

PLEASE click on each photograph so you can see the detail.


This is a perfect trio that I ordered from Jane Harrop.  One of the benches might go in the kitchen under the window to be used at the table when needed.  The other bench has a million possibilities.  Similarly with the two Sligo chairs - they will each tuck in a corner for the times the place is full of people.  I absolutely love the artist's easel.  This has made me decide on the cottage 'roof' floor being a studio.  I may have to cut into the roof to put in windows.  I am itching to do a dry build to think about all the ideas I have.

Incidentally I did wonder in a previous post about whether it had a roof at the back and, of course, it did.


This wonderful little finished (!!!) cheese board was a gift from Jane.  I simply can't believe how lucky I am.  

The object next to it is a cocktail stick.  Now do you appreciate her fabulous work even more?

I just grin from ear to ear every time I see it.


Please do click on this photo.  This is Jane's wonderful Christmas market stall complete with stock.  I am now the proud owner of all four packets of tiny wooden Christmas decorations that you can see here.  They are just perfect for The Gate House as I am setting it in 2013 and the run up to Christmas - pretty much now (!) in fact.

BIG thank you, Jane.

Go look at her stuff - Jane Harrop - better still try and catch her at a show as she has a ton more stock there to go at and every single item is beautiful.  

She will be at York on 24th November and that's a great show - one of my top three.  She is also at Kensington on 30th November.

This morning I got a delivery from Templewood miniatures and here are the 48ths that were in that order.


The detail on this chest is lovely. It just squats there, looking Tudor.  I know my Gate House people are collecting Arts and Crafts type furniture but, like any home, there is room for a harmonious piece from another time.  Actually there was a pretty big medieval revival in the arts and crafts movement so it will sit perfectly under a window in a bedroom.


True to form, Elizabeth and Stuart will sleep in a Rennie Mackintosh bed.  The Cherry wood is lovely to work with.


Like Jane, Kathryn is the sweetest person to 'work' with and, again like Jane, she was (silly) generous in sending me this table as an 'extra' because my order was a bit delayed.

How utterly serendipitous that it is one I would have ordered in the future.  My budget only allows me to buy in dribs and drabs so it was on the 'wish list'.  Tick!

This miniature world is full of some extraordinarily kind people.  Check out this one - Templewood Miniatures

Thursday, 14 November 2013

Second post already!

These photos are scanned from an A4 sheet enclosed with the kit so you can see what its giblets look like.  Quality is a bit iffy but it is the best we can do with what we've got.  Until I've built it!!! 


This is the front view - somehow the front comes off for viewing.  Gives me four rooms to go at - won't be able to do much with the courtyard as logically you have to be able to drive through there.


The back of the Gate House.  Not sure if there is a roof over what seems to be an outside area If there is a roof it would make a huge room but no windows??? I am inclined to think there is a roof as the stairs lead from the rooms below and you'd need dry access into the two upstairs rooms.  If there is no roof and it is a sort of battlement area, there doesn't seem to be any barrier wall and it would be awash with rain.............  "Curiouser and curiouser", said Alice.

Happy Birthday to me!!!

Just look at what I got for my birthday...........


......... well, not quite that............. more like this ...........


The list of components runs into three pages so, as someone who has never built the simplest of 48ths I am just a bit more than terrified at the prospect.

This is one of the creations made by Geoff Lewis whose work I found at Petwood back in August and this is the very one I wanted but decided I couldn't afford.  My lovely husband bought it and kept it for my birthday a couple of days ago and I am so, so thrilled.

If you have been looking at my Quarter Life blog you will have seen all the bits of 48ths I have been gathering together ready to go to Naples so I could get started on the four 'houses' I have waiting there.  Luckily most of it is Arts and Crafts style as I knew I wanted to create something that would house that.  They will be just perfect for this Scottish Gate House.

We are still stuck here in the UK waiting for an elderly aunt to leave hospital so I will have to be patient and resist the urge to get stuck in because this will be travelling to America with us as my project to do over there during our winter stay; the length of which is getting shorter and shorter as the weeks go by over here.